
When I started out on my scrapbooking journey five years ago, Photoshop Elements was my very first purchase. I had heard it was simple and easy to use and a great tool for the beginning scrapbooker. I discovered, however, that not only was it a great tool for the beginning scrapbooker, but it was also a great tool for the family photographer! Since most of us that scrapbook actually take the photos we use, this works out to be a fabulous bonus when selecting a software to start out with. We are the ones that document our children’s lives on a daily basis and we are the ones with the camera stuck to our eyeballs at our kiddo’s baseball game or cheerleading camp! So, since PSE is the software I started out with, it is only fitting that I lean this tutorial more towards the users of Photoshop Elements, although the same principals can be used in Photoshop as well!
One of the great things about Photoshop Elements is the many quick-fix options that can be used to fix or enhance our photos. I cannot tell you how many times when I was starting out, that I took a picture that was too dark or underexposed. The Enhance menu on the Photoshop Elements toolbar offers many quick fix tool choices such as Auto Smart Fix, Auto Levels, Auto Contrast, Auto Color Correction, and Auto Red Eye Fix. Although all of these can be used in some capacity or another, it really is not my preferred method of choice when it comes to fixing under or overexposed photos and that is mostly because it takes all of the control out of your hands and leaves it with the program. Today, I am going to share with you a few very quick and easy fixes using PSE and it's layer blend modes that will expand your photo correcting abilities and help YOU to make your photos shine!
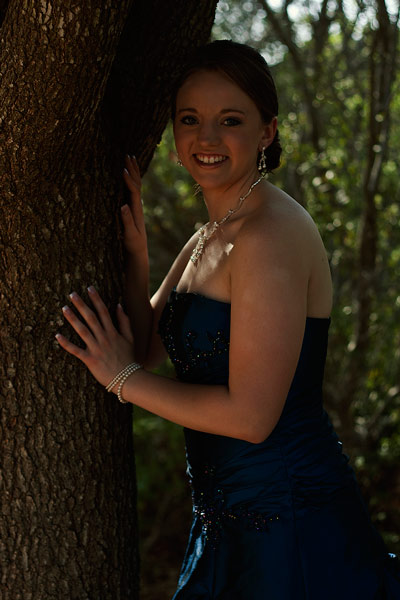
To begin, open up the underexposed photo you would like to fix. I have chosen a photo of my oldest daughter that I took right before her senior prom last year. I was in a hurry, trying to get some shots of her, and I forgot to change my ISO settings when I changed from sun to shade. I really loved this photo, however, and I wanted to see if I could make it work so I could scrap it!
Once your photo is open, locate it in your layers palette on the right side of your screen.

Select and highlight the photo layer by clicking on it in the layers palette. You will then need to duplicate the layer. You can do this a couple of different ways; either by hitting CTRL +J OR by right clicking on your photo and selecting Duplicate Layer. When the Duplicate Layer dialogue box pops up, click OK. You will now have two of the same photos in your layers palette.

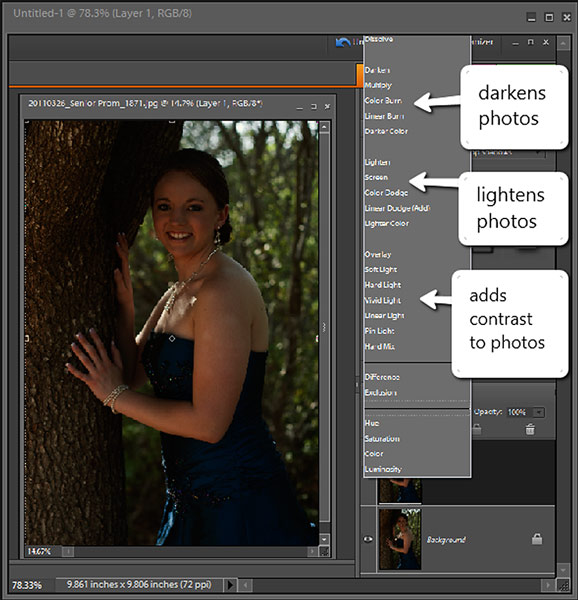
Once you have duplicated the photo (now called Layer 1), this is where the fun begins! With the top layer (Layer 1) selected (it appears dark gray on my screen) click on the drop-down blending mode menu (it is located above your photos and is the drop down menu that shows the word Normal). Click on the arrow and, from the drop down menu, select the Screen mode. You will notice that all of the modes are grouped together. The group that starts with Darken, will do just that..darken your photo. The next group will lighten your photos and the group after that (the one starting with Overlay) will add some contrast to your photo. Take a moment to play with each mode and see how it effects your photo.

Once you select the Screen mode, you will notice that your photo has lightened up a just a little bit. Depending on how dark your photo was, one pass may not be enough. If your photo is still too dark, you may duplicate the Screen Mode layer by selecting it and hitting CTRL+J. This should lighten your photo even more. Continue to duplicate the layer until you have gotten it just right. If you need to make it lighter, but clicking it that last time made it too light, then you can make an adjustment to the opacity on the top layer, by lowering it until you get it just how you want it. The Opacity menu is located right next to the Blending Mode Menu. Click on the drop down menu and slide the slider to the left to lower the opacity.

Once you have made the final adjustments to the opacity layer, you can then flatten the layers to create one image. Right-click on the bottom layer in the layers palette, and select “Flatten Image.” All of your layers will now be merged together to create one perfect image for you to use in your layout!
One thing to remember as well, is that sometimes, when lightening a photo, you will lose some of the contrast in the photo. To retrieve that back, and to give it that special pop, you can add back some contrast by duplicating the photo and changing the Blending mode to Soft Light. You will then need to lower the opacity to taste, but it will make your photo go from ho hum to yum yum!

Now isn’t that better? And it took less than 5 minutes to save a photo that I might have otherwise trashed!
You can use this same method to correct overexposed photos as well. Instead of choosing the Screen mode, you will choose the Multiply Mode, and then follow the same procedure as you did to fix the underexposed photo.
Isn't that quick AND easy??? There are a ton of ways to fix exposure on a photo, and this is just one of the many! Try it out and see what you think...I will share with you a few of the other ways in some tutorials that are coming up later!
Before I leave, if you are looking for a way to step out of that box and try something new, then why not try this lovely template provided by Scrapping with Liz this week at Scrap Orchard?? Its fun, its simple and to the point..has great composition and can be scrapped in a multiple number of ways making it very versatile!

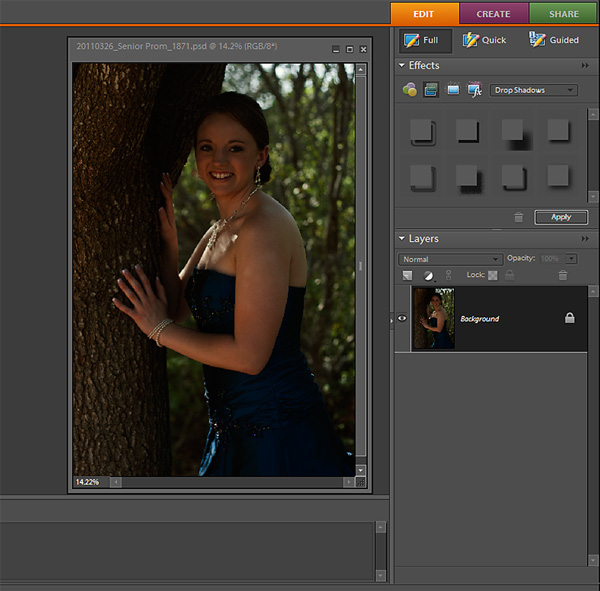
Select and highlight the photo layer by clicking on it in the layers palette. You will then need to duplicate the layer. You can do this a couple of different ways; either by hitting CTRL +J OR by right clicking on your photo and selecting Duplicate Layer. When the Duplicate Layer dialogue box pops up, click OK. You will now have two of the same photos in your layers palette.
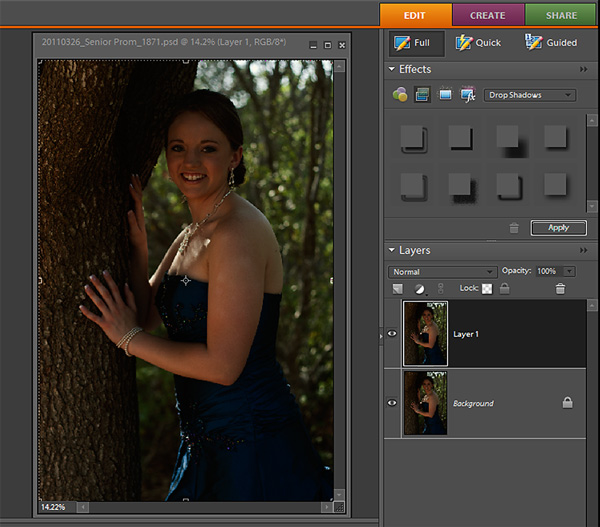
Once you have duplicated the photo (now called Layer 1), this is where the fun begins! With the top layer (Layer 1) selected (it appears dark gray on my screen) click on the drop-down blending mode menu (it is located above your photos and is the drop down menu that shows the word Normal). Click on the arrow and, from the drop down menu, select the Screen mode. You will notice that all of the modes are grouped together. The group that starts with Darken, will do just that..darken your photo. The next group will lighten your photos and the group after that (the one starting with Overlay) will add some contrast to your photo. Take a moment to play with each mode and see how it effects your photo.
Once you select the Screen mode, you will notice that your photo has lightened up a just a little bit. Depending on how dark your photo was, one pass may not be enough. If your photo is still too dark, you may duplicate the Screen Mode layer by selecting it and hitting CTRL+J. This should lighten your photo even more. Continue to duplicate the layer until you have gotten it just right. If you need to make it lighter, but clicking it that last time made it too light, then you can make an adjustment to the opacity on the top layer, by lowering it until you get it just how you want it. The Opacity menu is located right next to the Blending Mode Menu. Click on the drop down menu and slide the slider to the left to lower the opacity.
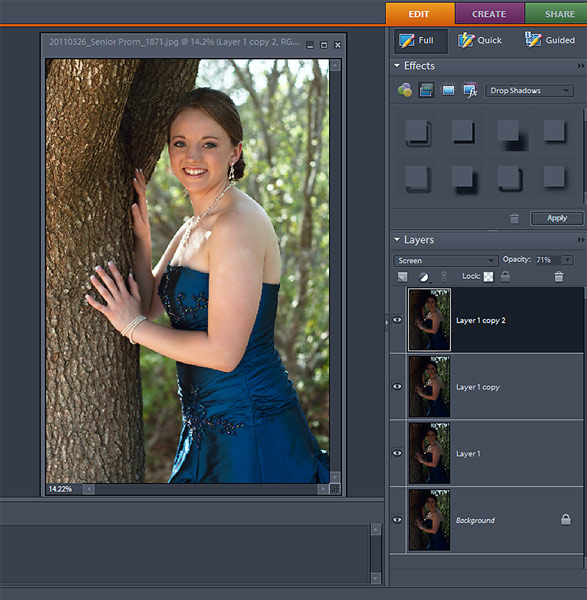
Once you have made the final adjustments to the opacity layer, you can then flatten the layers to create one image. Right-click on the bottom layer in the layers palette, and select “Flatten Image.” All of your layers will now be merged together to create one perfect image for you to use in your layout!
One thing to remember as well, is that sometimes, when lightening a photo, you will lose some of the contrast in the photo. To retrieve that back, and to give it that special pop, you can add back some contrast by duplicating the photo and changing the Blending mode to Soft Light. You will then need to lower the opacity to taste, but it will make your photo go from ho hum to yum yum!
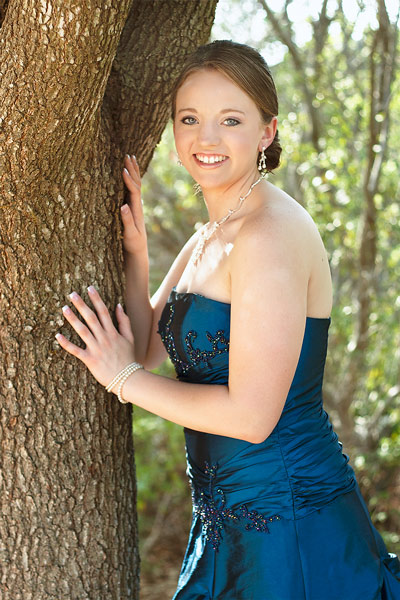
Now isn’t that better? And it took less than 5 minutes to save a photo that I might have otherwise trashed!
You can use this same method to correct overexposed photos as well. Instead of choosing the Screen mode, you will choose the Multiply Mode, and then follow the same procedure as you did to fix the underexposed photo.
Isn't that quick AND easy??? There are a ton of ways to fix exposure on a photo, and this is just one of the many! Try it out and see what you think...I will share with you a few of the other ways in some tutorials that are coming up later!
-------------------------------------------------------------------------------------
Before I leave, if you are looking for a way to step out of that box and try something new, then why not try this lovely template provided by Scrapping with Liz this week at Scrap Orchard?? Its fun, its simple and to the point..has great composition and can be scrapped in a multiple number of ways making it very versatile!
(Click here to go to the Scrap Orchard blog to download the FreeBee)
Here is my page with this fabulous template!

I used Bella Gypsy’s new kit Boy Extraordinary, to scrap my page!

Have fun and happy editing!!

Here is my page with this fabulous template!

I used Bella Gypsy’s new kit Boy Extraordinary, to scrap my page!
Have fun and happy editing!!


